You’ve spent all night tweaking your track until it sounds absolutely massive and complete. The bass shakes the walls, and the high-end is crisp. But the moment you upload it to Spotify or Apple Music, the excitement vanishes. Your track suddenly sounds small, quiet and drained of life compared to other songs. This is because mastering for streaming has a life of its own and if you don’t get, you simply don’t get it.
This topic can get really deep so we’ll try to keep to the shallow waters. I believe every beatmaker, sound designer, producer and composer should know a bit of the engineering part of music production. You shouldn’t be running to a mastering engineer for every tweak especially if you focus on sync. I know it’s very rare but imagine after a pitch submission, you were asked to adjust a song’s Dynamic Range or the LU (Integrated) to a particular dB level and you miss an opportunity trying to book a mixing/mastering session.
Back to the discussion, you might want to ask “why is my mix quiet on Spotify?”which is a sincere question a lot of people ask in their early days. The frustrating phenomenon is known as the loudness illusion. In your DAW, turning up the master fader makes everything sound great because our brains naturally associate volume with quality. However, streaming platforms do not play by that rule. They use automated systems to change how your music is played back. If you master your track too loud, these platforms will “normalize it” by turning it down, often destroying the punch and clarity in the process.
So What is Loudness Normalization?
Loudness normalization is the automated leveling process streaming platforms use to prevent listeners from constantly adjusting their volume wheels. Instead of measuring peak volume, platforms use LUFS (Loudness Units Full Scale). This metric calculates how humans actually perceive loudness over time. If your track exceeds a platform’s target level — usually around -14 LUFS, the algorithm automatically turns your track down. This leaves you with a quiet, squashed mix instead of a competitive master.
Industry professionals routinely deliver masters between -7 and -9 LUFS. If you master gently to -14 LUFS to avoid the streaming limiter, your track will lack the tight, competitive finish of professional tracks.
Reason 1: Chasing the -14 LUFS “Mythical Target”
Before LUFS became mainstream, deciding the real loudness for each streaming platform was a moving tharget. Mat Leffler-Schulman Mastering and Soundplate blogs has a guide to streaming loudness here that explains streaming LUFS targets for Spotify, Apple Music and Tidal, you may want to check them out.
If you have researched streaming audio online, you have likely seen advice telling you to master your music to exactly -14 LUFS. Many articles claim this is the golden target because it matches the default playback level of Spotify. However, blindly following this rule is one of the biggest reasons independent masters sound weak next to commercial releases.
Why the Official Advice is Misleading
The official guidelines are misleading because they focus on a safety floor rather than artistic competitive standards. While platforms do turn down tracks that are louder than -14 LUFS, major pop, hip-hop, and hybrid-orchestral masters are almost never delivered that quiet. Industry professionals routinely deliver masters between -7 and -9 LUFS. If you master gently to -14 LUFS to avoid the streaming limiter, your track will lack the tight, competitive finish of professional tracks. The platform will not turn your track up to match the others; it will just sound empty.
The Density vs. Volume Factor
The secret lies in sonic density rather than raw volume. When Spotify takes a heavy, saturated commercial track mixed at -8 LUFS and turns it down to -14 LUFS, the track keeps its aggressive, dense characteristics. The saturation, controlled transients, and tight low end are baked into the audio. If you master your track straight to -14 LUFS without building that internal density, your song will lack the perceived energy. It will feel small, loose and hollow by comparison, even though the meters say the volume is identical.
| Platform | Spotify | Apple Music | Deezer | Amazon Music | YouTube Music | Tidal |
| LUFS | -14 dB | -16 dB | -15 dB | -14 dB | -14 dB | -14 dB |
Reason 2: Your Dynamic Range is Tricking the Gate Meters
Dynamic range is essential for emotion in music, but unmanaged dynamics will confuse the automated systems handling your audio. Streaming platforms use specific mathematical formulas to scan your entire track from start to finish. If your song structure is highly unbalanced, the platform will miscalculate how loud the track actually feels to a human listener.
Integrated LUFS vs. The Dreaded Drop
Streaming networks look at integrated LUFS, which is the average loudness of a song over its entire duration. This creates a massive problem for tracks with drastic structural changes. Imagine a track that opens with a 30-second quiet, ambient string intro before launching into a massive, aggressive climax. Because the intro is so quiet, the mathematical average of the entire song drops significantly. The automated scanner sees a low overall number, hiding the fact that your main section is actually quite loud.
How the Measurement Gates Penalize You
The gating system used by streaming algorithms is designed to ignore long silences, but it still penalizes wide dynamic shifts. When a track has an incredibly quiet intro and a loud chorus, the platform tries to normalize the whole file based on that misleading average. As a result, the streaming platform may not turn down the track enough for the intro, or it might squash the main drop during playback. This leaves your high-energy climax sounding far quieter and less impactful than a consistently compressed commercial track.

Reason 3: Overlooking True Peak Inter-Sample Clipping
When you export your master, your traditional peak meters might show that your audio stays safely below 0 dB. However, traditional meters only measure the volume of digital samples, not the continuous analog wave created when those samples are played back. Ignoring these hidden peaks can ruin an otherwise perfect master.
The Dangers of Lossy Transcoding
When you upload a high-quality WAV file, streaming networks convert it into compressed, lossy formats like OGG Vorbis for Spotify or AAC for Apple Music. This transcoding process alters the shape of the audio waveform. Hidden inter-sample peaks that looked safe in your DAW suddenly overshoot 0 dB and clip. This distortion forces the platform’s playback engine to react defensively, applying harsh, unexpected limiting that degrades your sound.
Setting Safe Ceilings
To protect your music from this conversion, setting a strict True Peak ceiling is essential. Instead of capping your master output at -0.1 or -0.3 dB, you should set your limiter ceiling to at least -1.0 dBTP (True Peak). This buffer provides the necessary headroom for the transcoding process. It ensures your transients stay clean and unclipped, even when you push elements into heavy compression.
Reason 4: Frequency Balance Flaws (Too Much Invisible Low-End)
The tonal balance of your mix directly dictates how streaming algorithms treat your music. If your frequencies are distributed poorly, you will accidentally trigger the platform’s volume without gaining any actual acoustic benefits. The culprit is usually energy you cannot even hear on standard monitors.
The K-Weighting Filter Explained
To understand this issue, you must look at how LUFS meters measure audio. They analyze sound using a specific frequency curve called a K-weighted filter. This filter mimics human hearing by discounting extreme sub-bass frequencies and accentuating human-sensitive mid-to-high frequencies around 2 kHz. Because the algorithm hears the way humans do, a harsh midrange boost will register as much louder than a massive sub-bass boost on the streaming meter.
Energy Theft in the Sub-Basement
This measurement style creates a major trap if your mix has unmanaged energy below 30 Hz. High-energy sub-bass will trigger the limiters heavily in your home studio, squashing your dynamics before you even export. However, because of the K-weighting filter, that sub-bass barely registers on the streaming LUFS meter. This invisible low-end eats up your precious digital headroom, making your track trigger streaming compression without contributing to perceived clarity or loudness.
Mastering the hidden rules of music streaming platforms can be overwhelming, but a systematic approach will ensure your music translates perfectly.
Reason 5: Misunderstanding Spotify vs. Apple Music Algorithms
Every streaming platform handles volume normalization differently. If you master your music using a single, rigid approach, you overlook the unique processing habits of individual network. Designing a master that sounds excellent on one platform can lead to disappointing results on another.
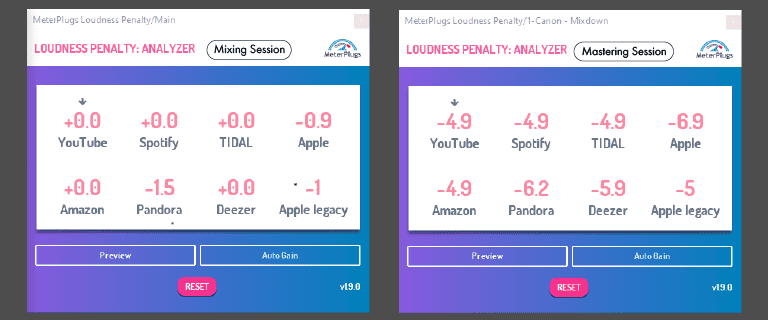
The image above is a perceived loudness for a track of mine “Canon”. Using MeterPlugs Loudness Penalty Analyzer, the first image’s loudness is at -14 LUFS (recommended for Spotify) but after mastering, it shot up by about 5dB. I’d need to reduce dynamic range by applying compression before adjusting actual volume. I’ve come to realise you can escape Spotify penalty overshooting the recommendation by 3dB to 4dB sometimes which is another topic by the way.
Apple Sound Check’s One-Way Street
Apple Music utilizes a system called Sound Check, which operates with a target level of -16 LUFS. Unlike other platforms, Sound Check is primarily a one-way street. It will actively turn loud music down to match its target, but it rarely uses peak limiting to boost exceptionally quiet tracks upward. If you deliver a highly dynamic, uncompressed acoustic piece that sits far below the target, it will remain quiet and stranded on the platform.
Spotify’s “Loud” Preset Artifacts
Spotify offers users a selectable premium playback profile called “Loud,” which targets a high level of -11 LUFS. To force tracks up to this extreme volume, Spotify applies a built-in brick-wall limiter directly to the playback stream. If your independent mix contains wide, natural dynamic peaks, this automated limiter will smash into your audio. This introduces unwanted distortion, pumping artifacts, and severe sonic degradation that you cannot control.
Mastering for Streaming: A Step-by-Step Blueprint
Mastering the hidden rules of music streaming platforms can be overwhelming, but a systematic approach will ensure your music translates perfectly. Competing with commercial releases is not about winning the old loudness wars; it is about smart engineering decisions.
Modern Strategy for Mastering for Streaming
Achieving a wide, professional, and translatable master is a problem solved during the mix stage, not on the master bus. You cannot fix a weak mix by simply pushing a final brick-wall limiter at the end of the project. Instead, build internal density safely using multi-stage saturation, subtle sub-group compression, and surgical arrangements that leave plenty of physical room for your primary instruments to breathe.
Essential Diagnostic Tools
Before bouncing your final master files for distribution, you must use reliable diagnostic tools to audit your work. Utilize software like the Youlean Loudness Meter to analyze your integrated LUFS, true peak levels, and dynamic range over time. Additionally, run your exported audio through online tools like the Loudness Penalty Analyzer (there are others from IzoTope, Mastering The Mix, Waves Audio, SSL) to see exactly how each major platform will adjust your track before you publish it. That way, you are on the safer side.
If you find this piece useful, consider checking out 7 Places to License Your Beats for Indie Films (That Aren’t BeatStars) then Cover, Sample or Interpolate? 8 Ways to Legally Use Published Songs. Hopefully you’d like them too.